Showing posts with label JAVA. Show all posts

Sunday, March 13, 2016

JQuery with XSLT

I have been trying some XML transformation with XSLT and as I saw the XML can be transformed into HTML, I thought why not include JQuery into the transformation that I am doing.

I took a sample XML, in XSL I included the HTML and javascript along with JQuery that I wanted.

XML to be transformed:

1
2
3
4
5
6
7
8
<?xml version="1.0"?>
 <root>
  <node_1>
   <element_1>Data of element 1</element_1>
   <element_2>Data of element 2</element_2>
   <element_3>Data of element 3</element_3>
  </node_1>
 </root>

XSL used to transform the above XML:


 1
 2
 3
 4
 5
 6
 7
 8
 9
10
11
12
13
14
15
16
17
18
19
20
21
22
23
24
25
26
27
28
29
30
31
32
33
34
<?xml version="1.0"?>
<xsl:stylesheet version="1.0" xmlns="http://www.w3.org/1999/xhtml" xmlns:xsl="http://www.w3.org/1999/XSL/Transform">
<xsl:output method="html" indent="yes"/>
 <xsl:template match="/">
 
  <html>
   <head>
    <link rel="stylesheet" href="http://code.jquery.com/ui/1.11.4/themes/smoothness/jquery-ui.css"/>
<script src="http://code.jquery.com/jquery-1.10.2.js"></script>
  <script src="http://code.jquery.com/ui/1.11.4/jquery-ui.js"></script>
    <script>
     $(document).ready(
     $(function() {
      $("#root").accordion();
     }));
    </script>
   </head>
   <body style="background-color:red;">
   <h1 style="text-align:center;color:white;">JQuery accordion</h1>
    <div id="root">
     <xsl:for-each select="/root/node_1/*">
     <xsl:variable name="counter" select="position()" />
      <h6><xsl:value-of select="concat('Step No.',$counter)"/></h6>
      <div>
       <p><xsl:value-of select="."/></p>
       <textarea rows="4" cols="100"></textarea>
      </div>
     </xsl:for-each>
    </div>
    
   </body>
  </html>
 </xsl:template>
</xsl:stylesheet>

In the above XSL transformation, I included the JQuery CDNs and javascript code to make the accordion available and I used a counter variable to dynamically name the accordion steps.

In the XSL I am accessing and looping through node_1's child elements and using the data of the elements in each steps of the accordion.

For transformation I used a java code based on the javax.xml.transform package and it's classes.

Java code used to transform and generate HTML:


 1
 2
 3
 4
 5
 6
 7
 8
 9
10
11
12
13
14
15
16
17
18
19
20
21
22
23
24
25
26
27
28
29
30
31
32
33
34
35
36
package com.java;

import java.io.File;

import javax.xml.transform.Transformer;
import javax.xml.transform.TransformerConfigurationException;
import javax.xml.transform.TransformerException;
import javax.xml.transform.TransformerFactory;
import javax.xml.transform.stream.StreamResult;
import javax.xml.transform.stream.StreamSource;

public class XSLTest {

 public XSLTest() {

 }

 public static void main(String[] args) {
  TransformerFactory factory = TransformerFactory.newInstance();
  StreamSource xslStream = new StreamSource(new File(
    "demoXslFile1.xsl"));
  Transformer transformer;
  try {
   transformer = factory.newTransformer(xslStream);
   StreamSource in = new StreamSource(new File(
     "demoFile1.xml"));
   StreamResult out = new StreamResult(new File(
     "htmlFile1.html"));
   transformer.transform(in, out);
  } catch (TransformerConfigurationException e) {
   e.printStackTrace();
  } catch (TransformerException e) {
   e.printStackTrace();
  }
 }
}

I used transformer class to transform the XML input to HTML output using XSL transformation file.

The transform method of Transformer class takes StreamSource and StreamResult type variables as parameters.

StreamSource variable holds the xml source file.

StreamResult variable holds the final html file where the html has to be put into.

Another StreamSource instance variable holds xsl file.

The TransformerFactory class' instance variable holds reference to a fresh object. The variable then can be used to call newTransformer method which takes xsl file's StreamSource variable as method paramter.

The Transformer class' instance variable references the above.

XML transformed into HTML:


 1
 2
 3
 4
 5
 6
 7
 8
 9
10
11
12
13
14
15
16
17
18
19
20
21
22
23
24
25
26
27
28
29
30
31
32
33
<html xmlns="http://www.w3.org/1999/xhtml">
 <head>
  <META http-equiv="Content-Type" content="text/html; charset=UTF-8">
  <link rel="stylesheet" href="http://code.jquery.com/ui/1.11.4/themes/smoothness/jquery-ui.css">
  <script src="http://code.jquery.com/jquery-1.10.2.js"></script>
  <script src="http://code.jquery.com/ui/1.11.4/jquery-ui.js"></script><script>
   $(document).ready(
    $(function() {
     $("#root").accordion();
   }));
  </script>
 </head>
 <body style="background-color:red;">
  <h1 style="text-align:center;color:white;">JQuery accordion</h1>
  <div id="root">
   <h6>Step No.1</h6>
   <div>
    <p>Data of element 1</p>
    <textarea rows="4" cols="100"></textarea>
   </div>
   <h6>Step No.2</h6>
   <div>
    <p>Data of element 2</p>
    <textarea rows="4" cols="100"></textarea>
   </div>
   <h6>Step No.3</h6>
   <div>
    <p>Data of element 3</p>
    <textarea rows="4" cols="100"></textarea>
   </div>
  </div>
 </body>
</html>

HTML rendering:


Applications of XSLT are just awesome, ability to transform the XML data into a structured format is just amazing.

Sunday, January 31, 2016

Sending text email from Java using Apache Commons Email

In this post, I wanted to show how to send an email using Apache Commons Email.

In this post I wanted to cover:
  • The program written in Java to send emails.
  • Challenges that I faced when sending emails.

Things one requires:

  • Eclipse.
  • Java.
  • Apache Commons Email library.
  • Two Gmail accounts (One acts as from address and one as to address) or One Gmail account (From and to address).

Apache Commons Email library can be downloaded from here: Apache Commons Email.

Configuration necessary in Eclipse before writing java program using Apache Commons Email library.

Create a Java project.
Right click on the project and choose properties.
In the properties choose Java Build Path and in Libraries tab click the button Add External Jars button on the right side.

Choose the jar that was downloaded from Apache website and add it.

Click OK and create a new Java class.

My Java class with Apache Commons Email code is as below:

 1
 2
 3
 4
 5
 6
 7
 8
 9
10
11
12
13
14
15
16
17
18
19
20
21
22
23
24
25
26
27
28
package com.java;

import org.apache.commons.mail.DefaultAuthenticator;
import org.apache.commons.mail.Email;
import org.apache.commons.mail.EmailException;
import org.apache.commons.mail.SimpleEmail;

public class ApacheMailSample {

 public static void main(String[] args) {
  Email email = new SimpleEmail();
  email.setHostName("smtp.gmail.com");
  email.setSmtpPort(465);
  email.setAuthenticator(new DefaultAuthenticator("<sender>@gmail.com", "<sendersPass>"));
  email.setSSLOnConnect(true);
  email.setStartTLSEnabled(true);
  email.setStartTLSRequired(true);
  try {
   email.setFrom("<sender>@gmail.com");
   email.setSubject("Test email from java program");
   email.addTo("<recipient>@gmail.com");
   email.send();
  } catch (EmailException e) {
   e.printStackTrace();
  }
 }

}

In the above code, I have created an object of class SimpleEmail.

I have set host to smtp.gmail.com, smtp port to 465.

To the DefaultAuthenticator's constructor I have passed Username (from address) and Password.

According to Google, the following has to be configured to send an email.


SMTP HOST: smtp.gmail.com

SMTPPORT: 587 (465 for SSL) 
USE SSL: Optional
SMTP Auth: Login


I have used port 465 in my java program and set SSL to true using method setSSLOnConnect.

I have set TLSEnabled to true using the methods setStartTLSEnabled and setStartTLSRequired.

Using methods setFrom, setSubject, addTo one can add from address, set subject of the email, set to address respectively.

One will have to send email using method send.

Challenges that I have faced:

  • Initially I was getting AuthenticationFailedException, on my google search I found out that we have to enable access to less secure apps on from email address at this link: Less Secure Apps Setting. I had to click turn on to let my java program access the email.
  • I have initially used smtp.googlemail.com and I was getting a message, couldn't connect to smtp host with response -1. After I changed the smtp host to smtp.gmail.com I was able to send emails.
  • Without having methods setStartTLSEnabled and setStartTLSRequired, I was getting the exception AuthenticationFailedException.


After I resolved the above errors, I was able to send email successfully from one email address to another (Gmail).

Sunday, October 11, 2015

Implementation of Euclidean Algorithm in Java

In this post, I am going to share the implementation of Euclidean Algorithm in Java.

Euclidean Algorithm is nothing but a method for calculating GCD of two numbers.

GCD (Greatest Common Divisor) : 

Take two numbers 20 and 30.

Factors of 20: 1, 2, 4, 5, 10, 20.

Factors of 30: 1, 2, 3, 5, 6, 10, 15, 30.

GCD refers to highest common factor of two numbers.

Now for 20 and 30, the common factor and the highest number is: 10. So GCD for 20 and 30 is 10.

The essence of this post is how can we calculate GCD in Java.

Well here it goes,


1:  import java.util.Scanner;  
2:  public class EuclideanAlgo {  
3:       public EuclideanAlgo() {  
4:       }  
5:       public static void main(String[] args) {  
6:            EuclideanAlgo euclideanAlgo = new EuclideanAlgo();  
7:            // Scanner class is used to values in the run time.  
8:            Scanner scanner = new Scanner(System.in);  
9:            // Below takes value of variable a.  
10:            System.out.println("Enter value for a: ");  
11:            int a = scanner.nextInt();  
12:            // Below takes value of variable b.  
13:            System.out.println("Enter value for a: ");  
14:            int b = scanner.nextInt();  
15:            // Calling method returnGCD to get GCD from there.  
16:            int gcd = euclideanAlgo.returnGCD(a, b);  
17:            System.out.println("GCD of " + a + " and " + b + " is: " + gcd);  
18:       }  
19:       private int returnGCD(int a, int b) {  
20:            if (b == 0)  
21:                 return a;  
22:            else {  
23:                 return returnGCD(b, a % b);  
24:            }  
25:       }  
26:  }  

Results are as follows:


In the above code, I used a Scanner class instance in lines 10 and 12 to record values of variables a and b at runtime and passed the values to a function in line 16.

The function returnGCD does the following:

Let's take value of a as 20 and b as 30.

Here 

The function is a recursive one and loops until it finds the second argument of the function to be 0.

If the second argument is not 0, it enters else and the arguments for the method becomes b and a%b.

Explantaion:

For example a is 20 and b is 30.

If condition is false since b is not 0.
Enters else and method is again called with arguments as 
a = 30 (b) and b = 20%30 (a%b) = 20.

If condition is false since b is not 0.
Enters else and method is again called with arguments as 
a = 20 (b) and b = 30%20 (a%b) = 10.

If condition is false since b is not 0.
Enters else and method is again called with arguments as 
a = 10 (b) and b = 20%10 (a%b) = 0.

Now this is a hit!

Code enters If and exits the method with value 10 which is GCD of 20 and 30.

Friday, August 7, 2015

Creation of zip file using Java

I want to show how we can create a Zip file in this post.

I am going to use a classes called ZipEntry and ZipOutputStream which are part of java.util.zip.

ZipEntry is used to create a zip file and ZipOutputStream takes data in an output stream and encloses the files in a zip.

I am reading the data from File Input Stream and writing to Zip Output Stream.

Reading count from file input stream and creating a byte of same size to accommodate the byte with file data and write to zip output stream.

I am writing data to File Output Stream and passing the File Output Stream instance variable as parameter to Zip Output Stream for the zip file to be created.

After writing data to zip file, we have to close the zip output stream and file output stream.

Check the below code for creating zip files using Java.


 import java.io.File;  
 import java.io.FileInputStream;  
 import java.io.FileOutputStream;  
 import java.io.IOException;  
 import java.util.zip.ZipEntry;  
 import java.util.zip.ZipOutputStream;  
 public class TestClass {  
      /**  
       * @param args  
       * @throws IOException  
       */  
      public static void main(String[] args) throws IOException {  
           String textFileName = "F:/abc.txt";  
           String zipFileName = "F:/createdFile.zip";  
           File textFile = new File(textFileName);  
           File zipFile = new File(zipFileName);  
           FileInputStream fiStream = new FileInputStream(textFile);  
           FileOutputStream foStream = new FileOutputStream(zipFile);  
           int count = fiStream.read();  
           byte[] bytes = new byte[count];  
           ZipEntry zipEntry = new ZipEntry(textFileName);  
           if (!zipFile.exists()) {  
                zipFile.createNewFile();  
           }  
           ZipOutputStream zoStream = new ZipOutputStream(foStream);  
           zos.putNextEntry(zipEntry);  
           while ((count = fis.read(bytes)) >= 0) {  
                zoStream.write(bytes, 0, count);  
           }  
           fiStream.close();  
           zoStream.closeEntry();  
           zoStream.close();  
           foStream.close();  
      }  
 }  

Sunday, August 3, 2014

Program for creation of XML document using DOM4J

DOM4J is an open-source java library for programming XML in java. 

I used Eclipse as the IDE and Java SE 7 Update 25 for developing the program. 

One have to download the DOM4J jars to start with. It can be downloaded from here DOM4J archive Download link. 

Once downloaded Unrar the rar file and consolidate all the jars from the folders and browse them into the build path of the Eclipse that you're using. Click ALT+ENTER on the project and properties window will open up, navigate to the Java Build Path section, in the Libraries tab click the button Add external jars and browse all the consolidated jars.


 The Eclipse project can be a simple java project.

DOM4J Program:
You can use this program to create the xml document using DOM4J. 

 package com.dom4j.xml;  
 import java.io.BufferedWriter;  
 import java.io.File;  
 import java.io.FileNotFoundException;  
 import java.io.FileWriter;  
 import java.io.IOException;  
 import java.io.StringReader;  
 import java.io.StringWriter;  
 import javax.xml.transform.OutputKeys;  
 import javax.xml.transform.Source;  
 import javax.xml.transform.Transformer;  
 import javax.xml.transform.TransformerConfigurationException;  
 import javax.xml.transform.TransformerException;  
 import javax.xml.transform.TransformerFactory;  
 import javax.xml.transform.stream.StreamResult;  
 import javax.xml.transform.stream.StreamSource;  
 import org.dom4j.Document;  
 import org.dom4j.DocumentHelper;  
 import org.dom4j.Element;  
 public class XMLCreation {  
      /**  
       * This method creates XML document upon calling.  
       */  
      private void createXML() {  
           Document document = DocumentHelper.createDocument();  
           Element root = document.addElement("Root");  
           Element child1 = root.addElement("Child1")  
                     .addAttribute("attr1", "attr1val")  
                     .addAttribute("loopNode", "no");  
           Element child2 = child1.addElement("Child2").addAttribute("loopNode",  
                     "no");  
           {  
                for (int i = 0; i < 3; i++) {  
                     Element loopNode = child2.addElement("Loop" + i);  
                     loopNode.addAttribute("loopNode", "yes");  
                     loopNode.addText("Loop Child " + i);  
                }  
           }  
           Source source = new StreamSource(new StringReader(document.asXML()));  
           StringWriter stringWriter = new StringWriter();  
           StreamResult streamResult = new StreamResult(stringWriter);  
           File file = null;  
           BufferedWriter bufferedWriter = null;  
           try {  
                file = new File("C:/DemoXMLFile1.xml");  
                file.createNewFile();  
                TransformerFactory transformerFactory = TransformerFactory  
                          .newInstance();  
                Transformer transformer = transformerFactory.newTransformer();  
                transformer.setOutputProperty(OutputKeys.INDENT, "yes");  
                transformer.setOutputProperty(  
                          "{http://xml.apache.org/xslt}indent-amount", "9");  
                transformer.transform(source, streamResult);  
                bufferedWriter = new BufferedWriter(new FileWriter(  
                          file.getAbsoluteFile()));  
                bufferedWriter.write(streamResult.getWriter().toString());  
                bufferedWriter.flush();  
                bufferedWriter.close();  
           } catch (FileNotFoundException f) {  
                f.printStackTrace();  
           } catch (TransformerConfigurationException t) {  
                t.printStackTrace();  
           } catch (IOException i) {  
                i.printStackTrace();  
           } catch (TransformerException t) {  
                t.printStackTrace();  
           }  
      }  
      /**  
       * Main method  
       *   
       * @param args  
       */  
      public static void main(String args[]) {  
           new XMLCreation().createXML();  
      }  
 }  

1. The process is pretty straight forward. I used Document interface and created an instance to it. 
2. I used this instance to create a root element using Element interface. I added attributes to the node. 
3. Further I created another Element instance and added node as child to the above root element and attributes.
4. I created a loop and every time loop iterates it creates child node to the sub child node and adds text to the loop node. 
5. I made use of TransformerFactory and Transformer to format the xml document. 
6. The normal BufferedWriter to write the xml to the document. 
7. The interface Source stores the document xml details in StringReader, the StringReader creates characterstream. 
8. I created an object to StringWriter class and passed the instance to the StreamResult interface. 
9. The StringWriter converts character stream to the buffered stream. 
10. To the transformer we have included output properties to provide indent to the xml file using setOutputProperty.

One can also use the Scanner class to provide file paths and file names as dynamic parameters.

The output file I got with Indent 9:


Suggestions are welcome. Please feel free to comment.

Saturday, July 5, 2014

Creating a simple java servlet

For creating a simple servlet, all we need is a HTML/JSP file and a java class.

Below is the Eclipse project structure for the Dynamic Web Project I created:

Below is the web.xml config I used:
I used two child elements in xml under web-app namely:
1. servlet
2. servlet-mapping

The element servlet contains two child elements further namely:
1. servlet-name - to specify the name of the servlet (name can be anything)
2. servlet-class - to specify the name of java class including package name.

The element servlet-mapping contains two child elements further namely:
1. servlet-name: to specify name of the servlet (the name should be same as one specified in the child element servlet-name of element servlet).
2. url-pattern: to specify the url-pattern of the servlet.

 <?xml version="1.0" encoding="UTF-8"?>  
 <web-app xmlns:xsi="http://www.w3.org/2001/XMLSchema-instance" xmlns="http://java.sun.com/xml/ns/javaee" xmlns:web="http://java.sun.com/xml/ns/javaee/web-app_2_5.xsd" xsi:schemaLocation="http://java.sun.com/xml/ns/javaee http://java.sun.com/xml/ns/javaee/web-app_3_0.xsd" id="WebApp_ID" version="3.0">  
  <servlet>  
  <servlet-name>Servlet1</servlet-name>  
  <servlet-class>com.servlets.ServletClass1</servlet-class>  
  </servlet>  
  <servlet-mapping>  
  <servlet-name>Servlet1</servlet-name>  
  <url-pattern>/Servlet1</url-pattern>  
  </servlet-mapping>  
 </web-app>  

Sample JSP code:
 <%@ page language="java" contentType="text/html; charset=ISO-8859-1"  
   pageEncoding="ISO-8859-1"%>  
 <!DOCTYPE html PUBLIC "-//W3C//DTD HTML 4.01 Transitional//EN" "http://www.w3.org/TR/html4/loose.dtd">  
 <html>  
 <head>  
 <meta http-equiv="Content-Type" content="text/html; charset=ISO-8859-1">  
 <title>Insert title here</title>  
 </head>  
 <h1 align="center">Enter your details down below:</h1>  
 <body bgcolor="yellow">  
 <form method="post" action="ServletClass1">  
 <center>  
 <table border="1" bordercolor="red" bgcolor="lime" cellspacing="20" style="font-size: 20px;font-family:inherit;" cellpadding="3">  
 <tr bgcolor="yellow">  
 <td>Name: <input type="text" name="name"><br/></td>  
 </tr>  
 <tr bgcolor="yellow"><td>  
 Profession: <br/>  
 Developer: <input type="radio" name="Developer"/><br/>  
 Architect: <input type="radio" name="Architect"/><br/>  
 </td>  
 </tr>  
 <tr bgcolor="yellow">  
 <td>  
 Skills:<br/>  
 <select name="skills">  
 <option value="J2EE" label="J2EE"></option>  
 <option value="J2SE" label="J2SE"></option>  
 <option value="J2ME" label="J2ME"></option>  
 </select></td></tr>  
 </table>  
 <input type="submit" value="Submit" style="font-size:20px;font-family:inherit;"/>  
 </center>  
 </form>  
 </body>  
 </html>  

You can use above code either in a JSP file or HTML file. I created three types of fields - text, radio buttons, drop down fields.
In the html elements I used form fields and have given the servlet name in action tag and POST method in method tag which means when the servlet is called it invokes POST method.

I am trying to retrieve the values that comes out when certain fields are containing values or selected from a servlet.

Servlet:
 A servlet is a simple java file that communicates with the server. A java file that extends HttpServlet class is said to be a servlet.

Below is the  sample java code that I have used:
 package com.servlets;  
 import java.io.IOException;  
 import java.io.PrintWriter;  
 import javax.servlet.ServletException;  
 import javax.servlet.annotation.WebServlet;  
 import javax.servlet.http.HttpServlet;  
 import javax.servlet.http.HttpServletRequest;  
 import javax.servlet.http.HttpServletResponse;  
 /**  
  * Servlet implementation class ServletClass1  
  */  
 @WebServlet("/ServletClass1")  
 public class ServletClass1 extends HttpServlet {  
      private static final long serialVersionUID = 1L;  
      /**  
       * @see HttpServlet#HttpServlet()  
       */  
      public ServletClass1() {  
           super();  
      }  
      /**  
       * @see HttpServlet#doGet(HttpServletRequest request, HttpServletResponse  
       *   response)  
       */  
      protected void doGet(HttpServletRequest request,  
                HttpServletResponse response) throws ServletException, IOException {  
      }  
      /**  
       * @see HttpServlet#doPost(HttpServletRequest request, HttpServletResponse  
       *   response)  
       */  
      protected void doPost(HttpServletRequest request,  
                HttpServletResponse response) throws ServletException, IOException {  
           PrintWriter out = response.getWriter();  
           out.println("<p style='font-size:20px'> Name: "  
                     + request.getParameter("name") + "</p><br/>");  
           out.println("<p style='font-size:20px'> Developer: "  
                     + request.getParameter("Developer") + "</p><br/>");  
           out.println("<p style='font-size:20px'> Architect: "  
                     + request.getParameter("Architect") + "</p><br/>");  
           out.println("<p style='font-size:20px'> Skills: "  
                     + request.getParameter("skills") + "</ps>");  
      }  
 }  

In the above code, I have used PrintWriter to enable logging into response file that will be returned by the server. If you use System.out.println (SOP), we get outputs in log files of the server. I used tomcat server version 7. Once I ran the JSP/HTML file on the server, I got the form as below:


I filled the above from as below:
 
 and I clicked the submit button and the server returns the below response: 
Since I didn't select Architect radio button it is coming as null and the rest are as selected.

Any suggestions are welcome. Please feel free to comment.

Sunday, May 11, 2014

Simple java program to copy files on any OS.


  • This is a simple java program to copy files from anywhere to anywhere in the file system and on any operating system.
  • Scanner in util package to make inputs dynamic.
  • Using the program you just have to enter source of input file with file name and destination where it has to be placed.
  • The code calculates the time taken for the processing too.

 package com.objectStream;  
 import java.io.File;  
 import java.io.FileInputStream;  
 import java.io.FileOutputStream;  
 import java.io.IOException;  
 import java.io.InputStream;  
 import java.util.Scanner;  
 public class DemoObjectStreamRead {  
      static long startTime = System.currentTimeMillis();  
      static Scanner scanner = new Scanner(System.in);  
      static final String FORWARD_SLASH = "/";  
      static final String COLON = ":";  
      public static void main(String[] args) throws IOException {  
           System.out.println("Enter source: ");  
           String inputFile = scanner.next();  
           String file = "";  
           file = inputFile.split(COLON)[1];  
           System.out.println("Enter destination folder(s)");  
           String outputFile = scanner.next();  
           if (!new File(outputFile).exists()) {  
                new File(outputFile).mkdirs();  
           }  
           outputFile = outputFile.concat(FORWARD_SLASH + file);  
           File ipFile = new File(inputFile);  
           File opFile = new File(outputFile);  
           InputStream is = new FileInputStream(ipFile);  
           int read = 0;  
           byte[] bytes = new byte[1024];  
           FileOutputStream os = new FileOutputStream(opFile);  
           while ((read = is.read(bytes)) != -1) {  
                os.write(bytes, 0, read);  
           }  
           is.close();  
           os.flush();  
           os.close();  
           long endTime = System.currentTimeMillis();  
           long time = endTime - startTime;  
           System.out.println("time taken: " + (double) time / 100 / 60 + " mins");  
      }  
 }  

Feel free to comment. Suggestions and comments are appreciated.

Sunday, June 30, 2013

Creating executable Jar files

    To make an executable jar file, one must have a .java file, let's create one sample:

Create a folder of some name and create the java file in there, so as to avoid confusion

HelloWorld.java


public class HelloWorld {

public static void main(String[] args) {

System.out.println("Hello World");

}
}

save it with.java extension, now we have HelloWorld.java

now open cmd from Run > cmd, hit enter

compile the java class, so to create a .class file like this:


Now we have a class file created in the drive, now create a manifest file with name like manifest.txt, this is a text file.

write in this txt (notepad) file, 

Main-Class: HelloWorld

In this file, HelloWorld is the name of Class that contains the main method, also hit enter in notepad after writing class name like this:


Now we have these files:

1. .java file
2. .class file
3. manifest file

now open the cmd and run this command in the folder that contains the java file, .class file, manifest file

jar cfm some_name.jar manifest.txt HelloWorld.class

you can use any name for the jar file that you are gonna create as long as there is a .jar after the name, when you hit enter it must not show any error like this:


 it must create a .jar file in the folder like this:


now if you double click this file it will not show you anything

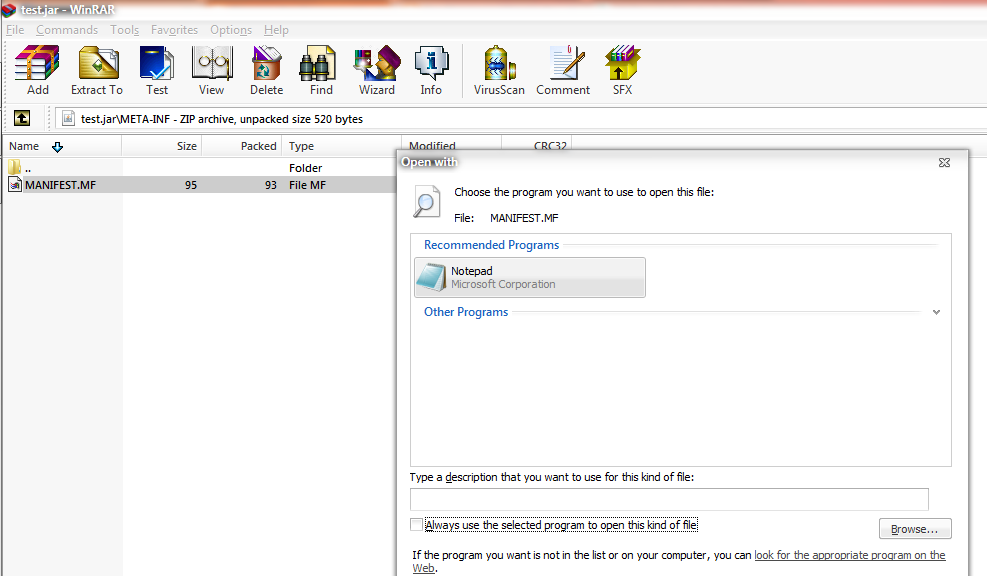
right click on this file and open this file with winrar or some compression software, you may see something like this:


 Open the test.jar with winrar and it must show these files, the .class file and META-INF folder

Open META-INF folder and you'll see


open this file with notepad, like this:


and you'll see this:


After making sure these things are right, go to cmd and execute the following command:

java -jar test.jar

and this will print "Hello World", which is present in the java file


This is what we used in println in the java file, now the jar is ready and is executable.


Monday, March 11, 2013

Web Services


         Web services is nothing but a resource through which you can convert your application into web application, also it helps data transfer between various platforms and applications and the most recommended format of transferring data is XML. XML has been recognized by W3C to be used exclusively for web services, in other words data is carried out in XMLs.
        Web services basically consists of three elements :
1. SOAP
2. WSDL
3. UDDI

SOAP : SOAP is Simple Object Access Protocol, which enables the transfer of data between various platforms and different languages, so this becomes the main part of web services. It uses HTTP protocol for the transfer of data.
SOAP basically consists of 
  • Envelope
  • Header
  • Body
  • Fault
Envelope : Envelope is the root element of the SOAP message, it consists soap:xmlns namespace which has default value of : 
    ---------------------------------------------------------------------------
    "http://www.w3.org/2001/12/soap-envelope"
    ---------------------------------------------------------------------------

    Example :
    ---------------------------------------------------------------------------------------------------------

    <?xml version="1.0"?>

    <soap:Envelope xmlns:soap="http://www.w3.org/2001/12/soap-envelope"
    soap:encodingStyle="http://www.w3.org/2001/12/soap-encoding">
    ............
    Messages that you want to transfer
    ............
    </soap:Envelope>
    ---------------------------------------------------------------------------------------------------------

    If any namespace other than soap:xmlns is used, it will not allow the transfer and generate an error.

    SOAP encoding Style attribute : It is the basic encoding style used in the SOAP
    soap:encodingStyle="URI".

    Header : Header is the first element of Envelope element in the SOAP message. It contains three attributes : 
    • mustUnderstand
    • actor
    • encodingStyle
    Body : This contains the actual message that will be transferred.

    ------------------------------------------------------------------------------------------------------------
    <?xml version="1.0"?>
    <soap:Envelope
    xmlns:soap="http://www.w3.org/2001/12/soap-envelope"
    soap:encodingStyle="http://www.w3.org/2001/12/soap-encoding">

    <soap:Body>
      <m:GetPrice xmlns:m="http://www.w3schools.com/prices">
        <m:Item>Apples</m:Item>
      </m:GetPrice>
    </soap:Body>

    </soap:Envelope>

    ------------------------------------------------------------------------------------------------------------

    Fault : It is an optional element and it is used to indicate error messages.


    WSDL : Web Services Description Language, is other part of web services which is used to locate and describe the application that is converted into web application. It's simply a link that takes you to the application, in other words you convert the data that is inter-operable between different platforms using SOAP and WSDL takes you to that data.

    UDDI : Universal Description, Discovery and Intergration, is a kind of directory for storing the information about web services it transfers data via SOAP.

    If you want to learn more about Web Services refer : 

    http://w3schools.com/webservices/ws_why.asp

    Comments

    blog comments powered by Disqus